
SNES (Super Nintendo Entertainment System
Step 2
2. Create a folder called 'Zsnes' inside your 'SNES' section of your emulation folder (see presetup).
Step 3
3. Unzip Zsnes into the 'Zsnes' folder you just made.
Step 4

4. Download Hamachi by clicking the download now button (see picture to left).
Step 5
5. Run the install file, and follow the prompts on the screen, keep clicking next. Make sure to leave the check box 'on' for 'open hamachi' when done installing.
Step 6
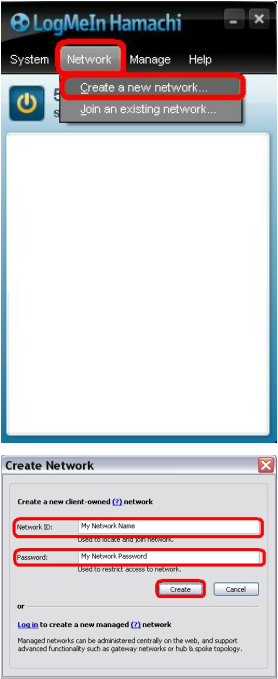
6a. If you do not plan to host, you can skip step 6. With Hamachi open, create a new network by selecting 'Network' at the top of the Hamachi window then select 'Create a new network' from the drop down menu. See picture left
6b. Pick a Network ID (name) and password. Name your network whatever you want. Pick a password you won't forget but at the same time something new that you do not already use, and feel ok about telling other people so they can connect to you. Click 'Create' when done.
See second picture left.
6b. Pick a Network ID (name) and password. Name your network whatever you want. Pick a password you won't forget but at the same time something new that you do not already use, and feel ok about telling other people so they can connect to you. Click 'Create' when done.
See second picture left.
Step 7
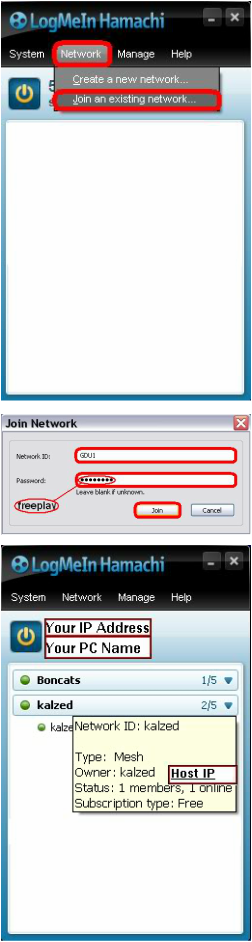
7a. If you only plan to host a network and never join you can skip step 7. To join a network again by selecting 'Network' at the top of the Hamachi window then select 'Join an existing network' from the drop down menu.
See picture left.
7b. Input the Network ID (name) and password of the network you wish to join (not your own network name and password).
See second picture left.
7c. After connecting to a network you should be able to find the hosts IP address by hovering your moue cursor over the network name in the Hamachi window. Once you and someone else are in a Hamachi network together, you are done with Hamachi.
See third Picture Left.
Step 8
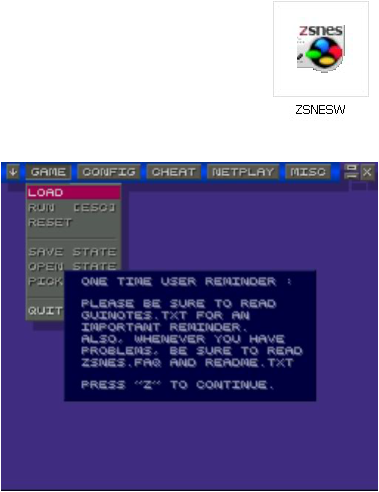
8. Run Zsnes by click the application icon (it should be inside your emulation section). See Picture left.
NOTE: You will see this prompt the first time you run the application.
See picture left.
NOTE: You will see this prompt the first time you run the application.
See picture left.
Step 9
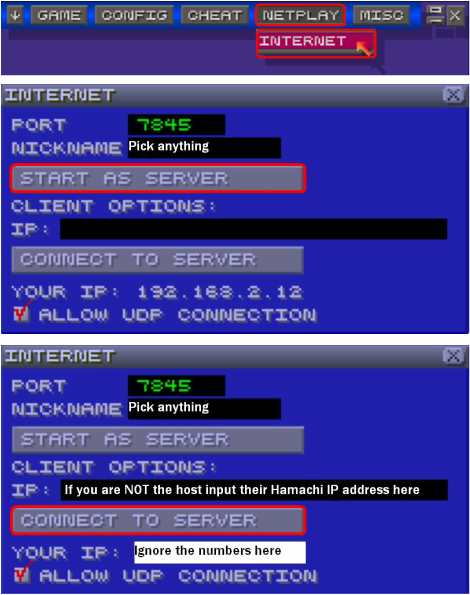
9a. With Zsnes running and the user interface(UI=esc) visible go to the 'Netplay' option at the top and select 'Internet'.
See picture left.
9b. With Zsnes' Internet window open decide which of the two of you are going to host inside Zsnes (it does NOT have to be the same person who hosted hamachi. Once the host is decided that person then enters their nick name and selects 'start as server' (leave the port number the same).
See second picture left.
9c. After one person has hosted the Zsnes server the other person can pick their nickname, then enter the hosts Hamachi IP address(shown in step 7c,) and then select 'Connect to Server'.
See third picture left.
9d. You should now both be in the same Zsnes chat window, which has a series of options, for now continue onto the next step. Picture pending.
Step 10
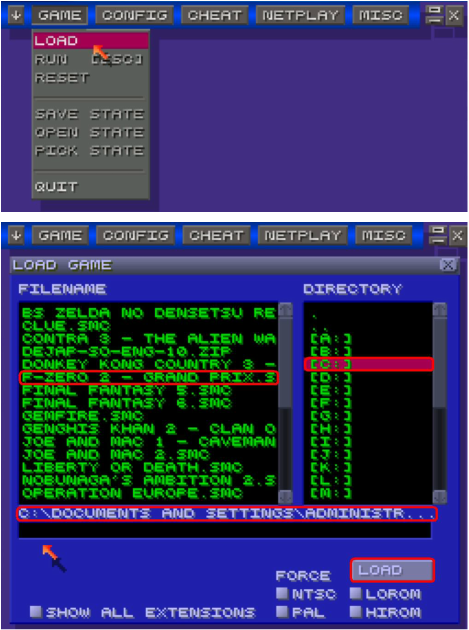
10a. In order to start play one player must go to the 'Game' option at the top of the screen and select 'Load'. See picture below.
10b. For the game to load correctly both people need to have the exact same file, with the exact same name and have their directory open (roms visible through Zsnes window, see picture below). Once in the correct directory, select the game you wish to play and then select load. See picture below.
IMPORTANT NOTE: It may take long to initially load a game, like up to and past 60 seconds, maybe even 2 minutes, be patient before giving up, as once loaded many games work almost flawlessly.
You should now both be able to play the game together, have fun!
TWO-PLAYER SNES GAMES
